AI WATERING Controller - MANUAL
The Best Controller for Irrigation System
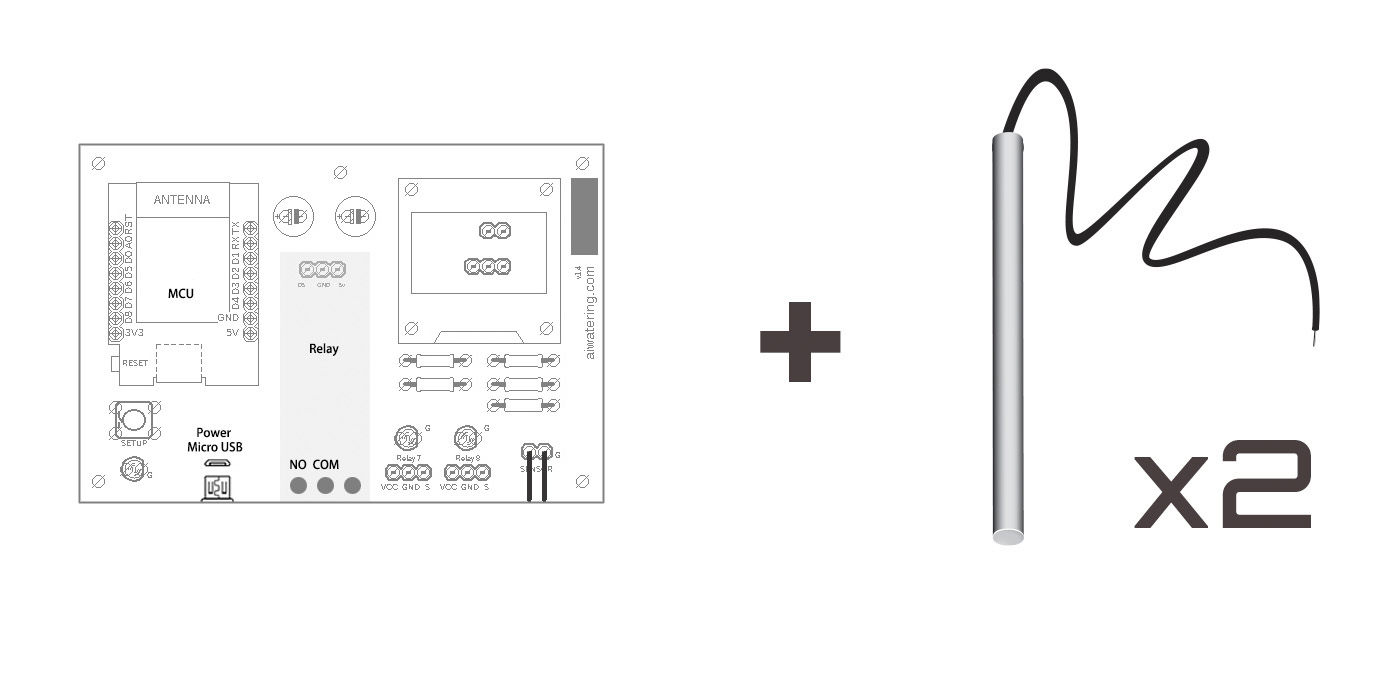
Items included
When you receive a package, please check whether you have the following items.
One AI WATERING controller and two soil moisture probes.
AI wisdom watering controller contains above items
Soil Moisture Probes
Connect the two ends of the soil moisture probes' wire to the device's probes connector. If the provided ones are not long enough, please attach an additional length of wires. Any wire can be used as long as it is convenient for you to construct.
To avoid unnecessary errors, it recommends that the soil moisture probes and the wire end be soldered.
Insert the soil moisture probes about 1 ~ 2cm apart from each other into the soil near the water source.
It may require 2 to 4 watering cycles to obtain a stable data.
Please note that the composition of the water/soil and scale will affect the soil condition data.
If the value of soil status record is higher than 880, Or there is no response, you may have to clean the probes and reinsert them back the soil.
If the force of watering too strong, it might cause soil loss around the probes and hence the value to rise in the soil data. When this occurs, please reinsert the probes to another firmer ground.
Power Supply
Any smartphone 5V Micro USB adapter can power this device (not included in the package).
Plug the 5V Micro USB adapter directly into the 5V USB socket to power.
Note:
Please do not plug the micro USB adapter to the D1 MCU USB socket.
Although it can power on the device, but it may cause soil data to be inaccurate.
Boot setting
Please have the following steps ready before booting up the device to make the device work properly:
1. Connect the soil moisture probes to the device and insert the probes into the soil close to the water source.
2. Arrange relevant water-line to your plants (Water Line Installation Instructions)
3. Arrange relevant electricity pipeline
4. Connect the wiring of the solenoid valve
Please seek professional help in installing the watering pipeline and the solenoid valve or motors that control the water source if necessary.
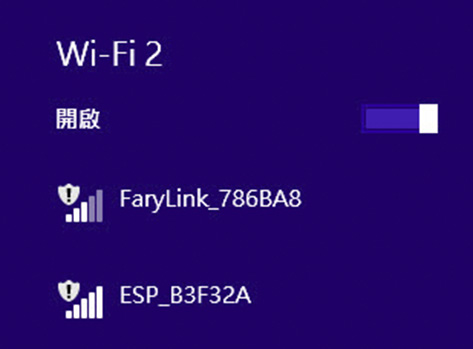
After power is on, you will see the system is searching for WIFI. If you wish to remote control this device, please read WIFI Settings first. If not, wait for 5 seconds and you will see the version screen.
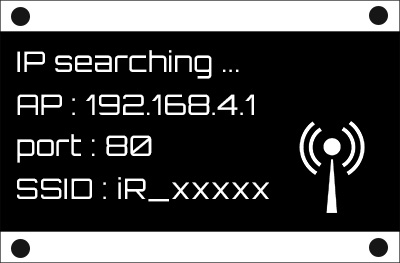
IP searching (The above figure shows that WIFI is not set and the system enters AP mode)
Version and setting information

Version and setting information
- The first line indicates the current version, which is now "ex.V1.51".
-
The second line indicates current soil condition value provided by the soil moisture probes (note: require 2 to 4 watering cycles to obtain a stable data), which is now showing "Soil 252 100% @ 250" it means the soil status is "252"
and the wettest value is 250(100%)
(Higher the number drier the soil is, 252 is drier than 250).
-
The third line indicates that a value has been set up to trigger auto watering, which is now set up at 300.
-
The fourth line indicates the watering time, which is now set up for 3 minutes.
SETUP #1
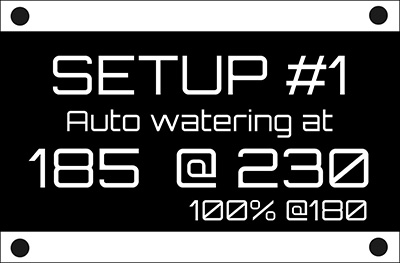 At this "SETUP #1" screen, you can set up a value to trigger auto watering.
 Press the "SETUP" button on the device to change the value.
When the set value is defined as 0, the auto watering function will be disabled.
If no change/setting is required, wait 5 seconds and you will enter the next screen.
SETUP #2
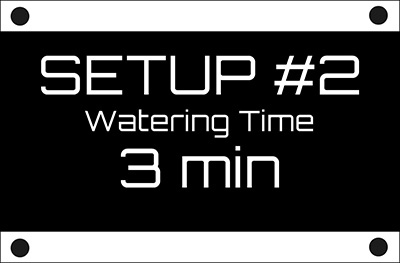 At this "SETUP #2" screen, you can set up the watering time (can also be set up via WIFI).
Press the "SETUP" button on the device to change the time. Each press changes to different watering time start from 1 minute to 3,5,7,9,11,13,15 minutes.
If no change/setting is required, wait 5 seconds and you will enter the next screen.
SETUP #3
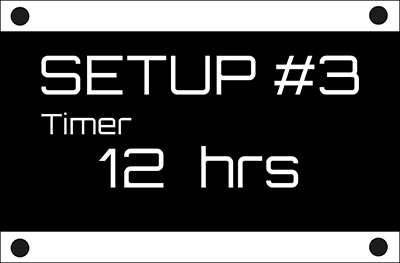 At this "SETUP #3" screen, you can set up the timer (can also be set up via WIFI).
 When the time is up, the controller will start watering, and the number on the timer will return to the set value and repeat until been changed.
Press the "SETUP" button on the device to change the time.
Each press changes to different countdown time start from 0 (zero) hour to 6,12,18,24 hours.
If a value is set up at 0 (zero) hour, it will disable timer watering function and you will get a count-up timer to show time elapsed since the last watering.
Note: This system does not have a time chip; therefore, time is for reference only.
If no change/setting is required, wait 5 seconds and you will enter the next screen.
Operation screen
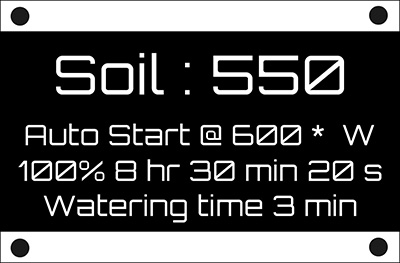 After the settings completed, the system enters this operational screen and displays relevant information.
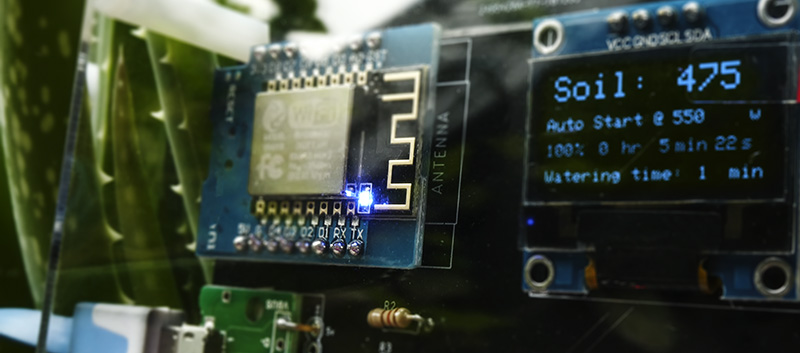
- "Soil : 550"
First line indicates current soil condition value.
-
"Auto Start @600 * W"
The second line indicates a value you set up to trigger auto watering, the value here is 600. When soil condition value reaches 600, it will start watering.
"*" indicates the system is currently in protection mode. When entering the protection mode, the device will not auto water for 2 hours after watering. The protection mode is to avoid repeated watering caused by automatic setting or soil sensing error. Protection mode is not affecting timer watering or manually forced watering.
"W" indicates that the device connected with WIFI, therefore, when you see "W", it means that the connection is successful.
-
"100% 8 hr 30 min 20 s"
The third line indicates the soil condition value in percentage (100% is soil at its wettest) and the remaining time (8hr 30min 20s) until next watering (timer).
-
"Watering time 3 min"
The fourth line indicates the watering time, irrigation time set up here is 3 minutes.
Watering mode
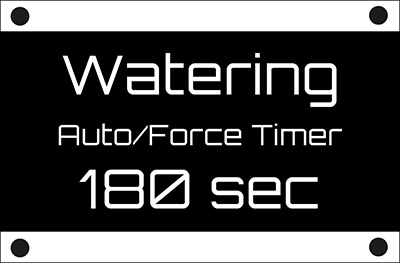 At this screen, it will show the remaining watering time.
 Unit is "seconds"
How to control water

Above solenoid valve & pump motor are not included in the package You can connect the solenoid valve or the pump motor to the relay main control terminal to control the opening and closing of the water source.
D7 & D8 expansion function (smart home appliances)
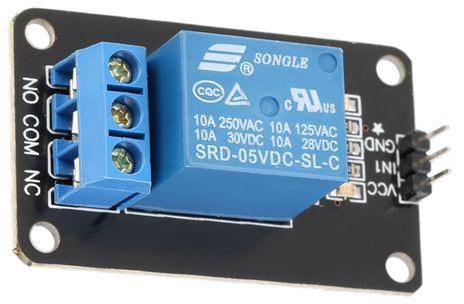
Please purchase the above relay according to your requirements, and connect them to D7 & D8 console. This device provides two additional control outputs D7 & D8.
To upgrade your appliances into smart ones that can be remote control via WIFI, connect High-Level Trigger Relay (not included in the package) to D7 or D8 console.
Attention:
D7/D8 trigger voltage is 3.3v
Thank you for chooseing the best
ideaRipple provides a device with many watering modes,
as long as you follow our manual steps, you can complete the setup in a short time.
Please find an operation demonstration video below:
If you wish to use wifi to remote control panel and see your online soil monitoring data record on IOT cloud, please read the WIFI settings below.
Piping demonstration and hydropower configuration
If you are installing an auto watering system from scratch for the first time, please see below link for waterway pipeline setting and hydropower setting instruction.